Latex vs Chalk Paint for Furniture; Pick the right one for your thrift store find!

New lease on life

When it comes to giving a new lease of life to old or worn-out furniture, painting is a popular choice. Two widely used techniques in this regard are furniture chalk painting and furniture latex painting. We will compare these methods, looking at their characteristics, application processes, durability, finish, and overall appeal. By understanding the strengths and weaknesses of each technique, you can make informed decisions for their furniture painting projects.

Characteristics

Furniture chalk painting involves using a chalk-based paint that leaves a matte, velvety finish. It has a soft, porous texture and gives furniture an aged, vintage look. On the other hand, furniture latex painting uses latex-based paint, which provides a smoother and more durable finish. Latex paint offers a wider range of colors and different sheen levels, allowing for greater customization.

Application Process

Chalk painting requires less preparation as it adheres well to most surfaces, often eliminating the need for priming or sanding. It is forgiving and allows for easy distressing and blending, making it a great choice for creative experimentation. In contrast, latex painting demands more preparation work, such as sanding and priming, to ensure proper adhesion and a smooth application. It usually requires multiple coats for an even finish.

Durability

In terms of durability, latex paint outperforms chalk paint. Latex provides a robust and resilient surface that withstands wear and tear over time. It is suitable for furniture pieces exposed to frequent use or placed in high-traffic areas. Chalk paint, though it offers a beautiful finish, is less durable. Without a protective topcoat, it can chip or scratch easily. However, applying wax or a clear topcoat can enhance the durability of chalk-painted furniture, although it still may not match the longevity of latex paint.

Finish and Aesthetic Appeal

Chalk paint gives furniture a charming, rustic, and shabby-chic finish, adding a vintage touch to any piece. Its matte appearance creates depth and texture, evoking warmth and nostalgia. Chalk painting works well for achieving distressed and aged effects, allowing for a desired antique look. On the other hand, latex paint offers a smoother, sleeker finish, giving furniture a more contemporary and polished appearance. With latex paint, a wider range of finishes, including gloss, satin, and matte, can be achieved, offering versatility to match various interior styles.

Maintenance and Touch-ups

Latex-painted furniture requires minimal maintenance, as it can be easily cleaned with soap and water. Its durable surface is less prone to staining and damage, making it suitable for households with children or pets. Touch-ups are relatively simple with latex paint, allowing for seamless repairs. Chalk-painted furniture, while charming, may require more frequent maintenance. Its porous nature makes it susceptible to staining, and extra care is needed during cleaning. Touch-ups on chalk-painted surfaces might require more extensive blending and distressing techniques to seamlessly integrate repairs with the existing finish.

Conclusion

In conclusion, furniture chalk painting and furniture latex painting are two popular methods for transforming furniture. Chalk painting offers a vintage and rustic aesthetic with a matte texture, while latex painting provides a smoother and more versatile finish. Latex paint excels in terms of durability, ease of maintenance, and touch-up capabilities, while chalk paint showcases a unique matte texture and distressed effects. Ultimately, the choice between the two techniques depends on personal preferences, desired aesthetics, and the intended use of the painted furniture.
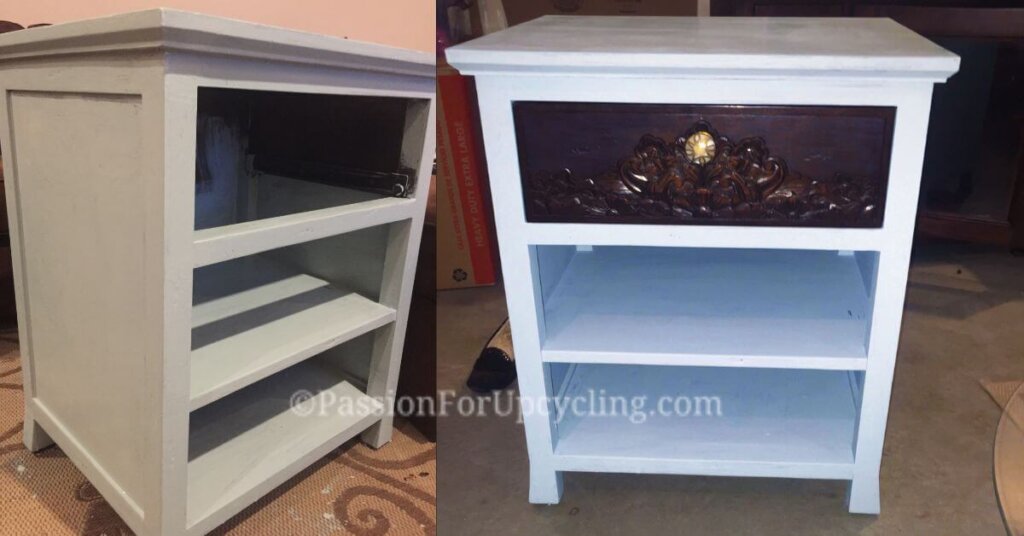


Chalk Paint will transform shabby to beautiful!

Chalk paint is a popular type of paint that has been widely used in recent years for its versatility and ease of use particularly with Chalk Paint Furniture. It’s a type of water-based paint that contains chalk powder, which gives it a unique matte and chalky finish. This finish is perfect for creating a vintage or shabby-chic look on furniture, walls, or any other surface you want to paint.

Chalk Paint Furniture is in! You too can upcycle your thrift store dresser score, by refinishing it in exciting and trendy Chalk paint! Chalk Paint is perfect for creating a vintage or shabby-chic look. Add your style appropriate hardware to compliment the Chalk paint, creating that one of a kind piece that you were looking for! Follow me for Chalk Paint Ideas! #SherwinWilliamsPaint, Chalk Paint Ideas, PassionForUpcycling,

Here are the basics you need to know:

Chalk Paint Furniture is in! You too can upcycle your thrift store dresser score, by refinishing it in exciting and trendy Chalk paint! Rust-Oleum Chalk Paint is perfect for creating a vintage or shabby-chic look. Add your style appropriate hardware to compliment the Chalk paint, creating that one of a kind piece that you were looking for! Follow me for Chalk Paint Ideas!


Dresser drawer repair of your failing veneer is simple!

Dresser drawer repair of veneer, with some basic tools and a few tips from me, you too can repair your failing dresser drawer veneer! This thrift store dresser find had good bones, but the drawers’ inside front panel needed help. I was able to see through the torn and chipped veneer to see the strong, solid wood underneath. I knew that dealing with that veneer wouldn’t be a big deal. Some would view the veneer as a big deal, but in the upcycling world, It was just a minor task, on the refurbish checklist, of this restoration.

You will need these items

Upcycling of the failed veneer dresser drawer

Dresser drawer repair, with sand paper and wood patch isn't hard! This thrift store dresser find had great promise, but the drawers needed help! With some basic tools, you too can repair your failing dresser drawer veneer, with a few tips from me!
Dresser drawer failed veneer glue down

  • Scrape away any loose veneer.
  • Glue down the bigger pieces that are loose, but otherwise attached.
  • Let the glue dry overnight.

Drawer veneer repair Tools

  • Using your wood patch of choice, I used Zar, liberally lay down the wood patch, at a level slightly higher than the remaining veneer. A wide putty knife and taping knife (sheetrock) works well for me.
  • In this example, I found that 1/2 Pint of wood patch was more than enough to repair this 5″x30″ inner drawer front, with some to spare.
  • Let it dry for at least 24hrs.

Dresser drawer repair of veneer, with some basic tools isn't hard! This is the finished product, ready for paint.

After the wood patch has dried, you are now ready to sand. I block sanded with 220 grit and then went to 360, to get it smooth and level.

Don’t forget to clear out the hardware holes. I used a Philips screw driver.

You are now ready for paint!


Always Wear Your Safety Equipment!

Always wear the appropriate safety equipment!


Dresser Edge Repair is Easier Than You Think!

I purchased this dresser, at a thrift store that had great potential, in other words it needed a lot of love ! This particular piece had lived a hard life and was consequently in need of dresser edge repair, which in this case was the corner. Edges and corners can take a lot of abuse, as they act like the bumper, on your car or truck.

Dresser edge repair may sound daunting, but really it isn’t difficult. The task requires minimal tools, a work space and some time. Typically, this type of repair is a precursor to the main project ie. restoration of the entire piece. I’ll go ahead and explain to you how to do it.

Dresser edge repair, of a dresser I purchased at a thrift store was mandatory! The dresser had great potential, but needed a lot of love ! This particular piece had lived a hard life and need some furniture repair. This may sound daunting, but really isn't difficult. You can do it too, with just a little guidance. I'll show you how!

You’ll need these items

Repairing a corner is not hard to do!

Dresser edge repair, of a dresser I purchased at a thrift store was mandatory! The dresser had great potential, but needed a lot of love ! This particular piece had lived a hard life and need some furniture repair. This may sound daunting, but really isn't difficult. You can do it too, with just a little guidance. I'll show you how!

  • Remove any loose wood fibers that may be hanging on the corner piece, of your dresser edge repair area . These loose pieces should plucked out.
  • Apply a liberal amount of wood filler/patch, so that the patch sits higher than the wood surface itself. Shrinkage will be minimal.
  • Allow the patched area sufficient time to dry thoroughly. Drying time will depend on thickness of the application, your environment and the product itself. Please read the product instructions.
  • Using sandpaper wrapped around a flat hard object, like a 2×2; sand the area, levelling the patch to match the surround edge. Sand lightly, as the patch material exfoliates quite easily. I start with 220 and finish with 360, with great results.

Dresser edge repair, with some sand paper and wood putty isn't hard!

  • After sanding and you’re satisfied with the shape, you should wipe off the area with a clean slightly damp rag.
  • Once fully dry, you can proceed with primer and paint. The patch is not water proof, until painted over.
  • Note: old wood filler that has been exposed to air, may not produce satisfactory results. In other words, don’t use any product that has a hint of being dry!


Always Wear Your Safety Equipment!

Always wear the appropriate safety equipment!


Veneer bubble repair will transform tattered to beautiful!

Veneer bubble repair can be intimidating for many people. Veneer bubbling is a problem with older furniture. Many people shy away from thrift store or yard sale finds, that have veneer bubbling, but I think that’s a mistake! You could be walking away from a diamond in the rough. I have purchased quality furniture pieces, that had bubbling veneer, at dirt cheap prices, knowing that I could easily bring it back to life, with some basic veneer bubble repair techniques!

Bubbling looks like this!

Veneer bubble repair can be intimidating for many people. Veneer bubbling is a problem with older furniture. Many people shy away from thrift store or yard sale finds, that have veneer bubbling, but I think that's a mistake! You could be walking away from a diamond in the rough, when you could easily bring it back to life, with some basic veneer bubble repair techniques!

Here is what you need to fix the bubbling

Veneer bubble repair can be intimidating for many people. Veneer bubbling is a problem with older furniture. Many people shy away from thrift store or yard sale finds, that have veneer bubbling, but I think that's a mistake! Here are some of the basic items that you need to make the repairs yourself! #FurnitureMakeoverDiy, #FurniturePainting, #PassionForUpcycling

  • Wax paper/freezer paper or parchment paper.
  • Wood glue
  • Utility knife
  • Meat injector syringe. I used “Good Cook” brand.
  • Pastry or Pizza Roller. I used Ekco brand.
  • Flat weighted object; books, bricks, level board with on top, etc.
  • Baby wipes or damp rags to wipe off excess wood glue.
  • C-clamps, wood clamps, etc., depends on your project.

Now we start the veneer bubble repair

Veneer bubble repair with a utility knife.

Using your utility knife, slice through the center of the bubble, for the full length. Be careful to only penetrate the veneer layer.

Veneer bubble repair glue injection

  • Fill your handy dandy Meat Injector syringe with wood glue.
  • Generously inject the wood glue into the veneer’s air pocket, working your way along the entire slice that you created.
  • Cover the area being worked with wax paper.
  • Using your pasty roller, roll over the area, ensuring that the glue is evenly distributed under the veneer.
  • Remove and discard the wax paper.
  • Wipe off excess glue with baby wipe or damp rag.

Veneer bubble repair of a drawer.

Drawer

For a drawer repair, I found that wax paper, flat scrap wood and clamps worked perfect to compress the veneer repair, until it has dried. I found that 24hrs was an ample cure wait time.

Veneer dresser repair. Dresser flipped on its side, to apply pressure evenly to the glue.

Furniture side panel repair

Its very difficult to apply clamps to big areas, such as the side of a dresser. A solution that works well for me, is to lay the dresser on its side. It so simple and works out great! This approach ensures the even compression, of a large area.

Wax paper, flat scrap wood and bricks/books worked perfect, to compress the veneer repair, until it has dried. Again, allow a 24hr cure wait time.

You will want follow by wiping, or lightly sanding off any glue residue before painting or staining.


Always Wear Your Safety Equipment!

Always wear the appropriate safety equipment!


You don’t have to be a painted furniture expert!

Painted furniture is a great way to add color to your interior design. I just wrapped up painting an accent wall, in our home, in beautiful Sherwin-Williams “Still Water” (SW 6223), which compliments the existing wood work nicely . I love the Sherwin Williams paint colors. I find the “Still Water” color to be unique and felt that we needed to carry the color, into other aspects, of our main level design. I had coincidentally just purchased a rustic dresser, at a thrift store, for a steal, to refinish (reclaim) and decided that the dresser refinished, in Still Water, would be the perfect addition, to our home’s main level.

You too can dive into painted furniture, by upcycling your own thrift store dresser score. I love the Sherwin Williams paint colors variety. I opted to refinish my own dresser, in this exciting and trendy Sherwin-Williams Still Water paint! The recycled dresser’s new paint job was an furniture excellent compliment, to the Still Water paint that I used elsewhere, in my home’s main level design!

Still Water is a complex color. It is characterized as a “dark blue”, but to my eye it has hints of green. I love it because it draws you in.

Still Water color code – SW6223

Still Water Dresser refurbished in beautiful Sherwin-Williams Still Water paint!

Here are the items that you will need:

This is how I transformed this rustic old relic!

Passion for Upcycling before image of rustic old dresser.

This is a picture of the dresser, as it was when I rescued it from a local thrift store. As you can see, it needed some love. In spite of exterior, it was a solid mahogany piece and well worth the effort!

Sunnyside TSP using it to prepare a dresser for paint. This all purpose heavy duty cleaner that is safe for the environment aka "eco friendly". PassionForUpcycling.com

I needed to wash the dresser to remove all of the dirt, grime, oils, cobwebs, etc., in preparation, for sanding. The TSP is a great all purpose cleaner, that was perfect for this project! Please follow the manufacturer’s instructions.

Palm sanding is an important step in the preparation, of most wood related projects. I have found that the palm sander, such as the Milwaukee brand, are perfect for providing a quick and light sanding to a wood surface, such as an old dresser!

Palm sanding is an important step in the preparation, of most wood related projects. I have found that the palm sander, such as the Milwaukee brand, are perfect for providing a quick and light sanding to a wood surface, such as an old dresser. In this case, a light sand is all that is needed to remove the surface gloss, imperfections and provide a surface, for paint to adhere to.

Follow sanding by removing the sanding residue/dust, with an air compressor or vent side of shop vac or damp cloth.

Identify any surface flaws, fill with wood filler and lightly sand after drying.

Rustic dresser after palm sanding, air compressor blow off and wipe down with a damp rag. The dresser is already looking awesome! You can now see the character of the wood, particularly the nice wood grain. The light sanding step was very important and took very little effort, with the sweet Milwaukee palm sander that I used.

The rustic dresser, after palm sanding, air compressor blow off and wipe down with a damp rag. The reclaimed dresser is already looking awesome! The light sanding step was very important and took very little effort, with the sweet Milwaukee palm sander that I used. The wood surface is now ready to accept paint.

You too can dive into painted furniture, by upcycling your own thrift store dresser score. I love the Sherwin Williams paint colors variety. I opted to refinish my own dresser, in this exciting and trendy Sherwin-Williams Still Water paint! The recycled dresser's new paint job was an excellent compliment, to the Still Water paint that I used elsewhere, in my home's main level design!

This is the paint (SW6223) that I had left over from my accent wall paint project. Fortunately, I had a lot left over, saving me another trip to the Sherwin Williams store.

I love the Sherwin Williams paint colors variety. I opted to refinish my own dresser, in this exciting and trendy Sherwin-Williams Still Water paint! As good as the Sherwin Williams paint is, it does dry fast! I used Floetrol, which gives you more working time. No one likes to to be rushed, especially when applying paint to a rustic piece of furniture.

I opted to refinish my own dresser, in this exciting and trendy Sherwin-Williams Still Water paint! As good as the Sherwin Williams paint is, it does dry fast! In general, I find that matt finishes dry fairly quick. I added Floetrol, to the paint, which gives you more working time. No one likes to to be rushed, especially when applying paint to a rustic piece of furniture.

The rustic dresser, after palm sanding, air compressor blow off, wipe down with a damp rag, with paint and no hardware. The reclaimed dresser is looking sharp, even with no hardware! I am very happy with the way this project is coming together. I can't wait to install the new hardware, giving it the final bling!

For the detail areas, I found that a “Chalk and Wax” round brush (No.8) worked great, while a 4″ high density foam roller, was the way to go, for the larger flat surfaces ! I found that the Still Water paint covered well, requiring only two light coats.

and no hardware. The reclaimed dresser is looking sharp, even with no hardware! I am very happy with the way this project is coming together. I can’t wait to install the new hardware, giving it the final bling!

Painted furniture is in! You too can upcycle your thrift store dresser score, by refinishing it in this exciting and trendy Sherwin Williams Still Water paint! The recycled dresser's new paint job was an excellent compliment, to the Still Water paint that I used elsewhere, in my home's main level design! The hardware that I added compliments Still Water's finish quite nicely! Click to read more!

Painted furniture is in! You too can upcycle your thrift store dresser score, by refinishing it in this exciting and trendy Sherwin Williams Still Water paint! The recycled dresser’s new paint job was an excellent compliment, to the Still Water paint that I used elsewhere, in my home’s main level design! The hardware that I added compliments Still Water’s finish, giving a contemporary flair, to an old piece!


Always Wear Your Safety Equipment!

Always wear the appropriate safety equipment!


You too can make your own exciting DIY Tripod Lamp!

The wooden DIY tripod lamp, has become very popular, in home interior décor.  I have admired them.  During one of my garage sale treasure hunting expeditions, I ran across a tripod that had previously been used to support a telescope, with adjustable legs, in the “free” pile!  I knew that I could turn this into a cool adjustable DIY tripod floor lamp, to refresh our home interior design!

DIY tripod adjustable telescope lamp.

Items needed

– Lamp kit
– Lamp rods (3)
– Shade (drum)
– Stain of your choice.  I used:
– MinWax Colonial Maple
– Polyurethane of your choice.  I used:
– MinWax Fast Dry Clear Satin
– Rubber gloves
– Baby wipes
– Lint free rags
– Chip brush
– Sandpaper 100 grit
– Sandpaper 220 grit
 – 1” Bushing (1)

** Take a “before” picture; to recall how to put this back together! 😊

Break down

1.) Disassemble the tripod.
2.) Place small parts in zip-loc bags.
3.) Label the bags accordingly.

Wood Legs

1.) Hand sand off the brown paint, from wooden legs and wipe with damp lint free cloth.
2.) Apply stain with lint free rags.
3.) Let dry 24 hours
4.) Light sand with 220
5.) Wipe with slightly damp rag or tack cloth.

6.) Apply Polyurethane with “chip” brush.
7.) 24 hours let dry

DIY telescope adjustable lamp.

Metal structure prep

1.) Distress (Optional)Distress the old paint, with 220 grit sandpaper, to achieve an older, distressed look!
2.) Clean the distressed pieces with a damp rag.
3.) Apply a low-sheen, matte Polyurethane (spray).
4.) Let dry (24 hrs)
5.) Measure center of triangle support piece and a drill hole large enough to accommodate the rubber bushing.
6.) “Squeeze” rubber bushing into the triangle support piece, center hole.

DIY tripod telescope adjustable lamp.

Assembly

1.) Using the “before” pictures that you took at the beginning 😊, reassemble the tripod.
2.) Insert lamp rod through bushings and connect to second and third lamp rods, if needed.
3.) Feed the lamp cord from the bottom lamp rod, up through the top.
4.) Assemble the lamp kit, as per kit instructions.
5.) Attach your lamp shade!


Always Wear Your Safety Equipment!

Always wear the appropriate safety equipment!